Creating blogs, updating blog settings, publishing blog posts with SEO friendly techniques become easy when a techie friend guides you thoroughly from starting to end. Though we are not on a single blogging platform, but it is possible at least to become a master of a little thing. Blogger which have 50 MN bloggers today is a massive blogging platform for all its users and new comers. Though it is dynamically changing its design, gadgets, technology etc so its policy and user friendly interfaces also. Now it is easy to everyone to do blogging on their own contents and ideas as Blogger has made everything simple and easy from starting to end including earning through Adsense. So it is now a hope for bloggers to have a Blogger's Blog. So let's ready to start.
Creating a Blogger blog with perfect setting
- Login to Blogger by Gmail ID and password.
- If you are a new user then click on create new blog.
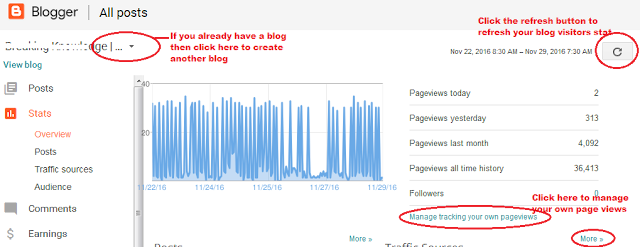
- If you already have a blog then look at image below. click on the blog dropdown menu and choose 'New Blog'
- The image displayed above also shows the statistic of your blog.
- Now go to settings tab in the left panel. By default it will open the basic setting where you can edit blog name, description, blog address and https setting.
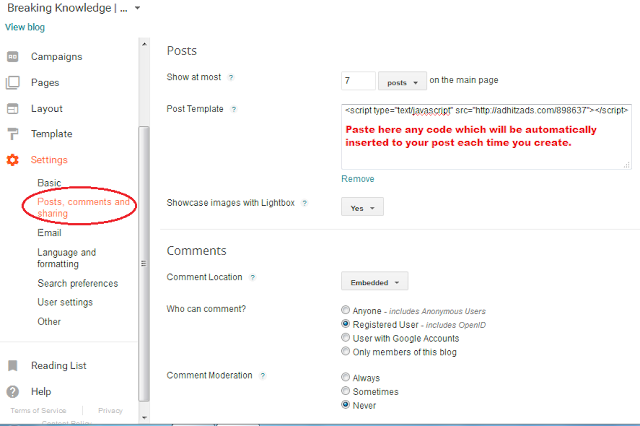
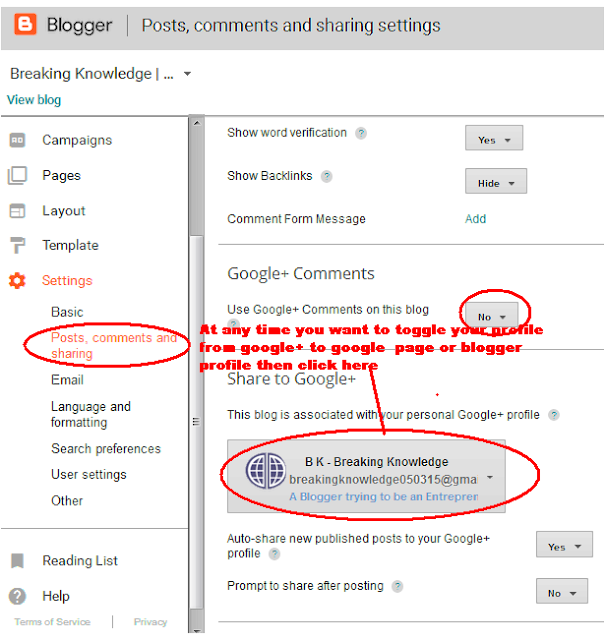
- Now click on the Posts comments and sharing option below the Basic setting. Here you will edit how many posts to display on home page, Post Template, Share to Google+ etc. Here an important thing is if you connect your Google+ profile, it will show the options for auto sharing or promt for sharing after publishing each post. if you select yes then it will work.
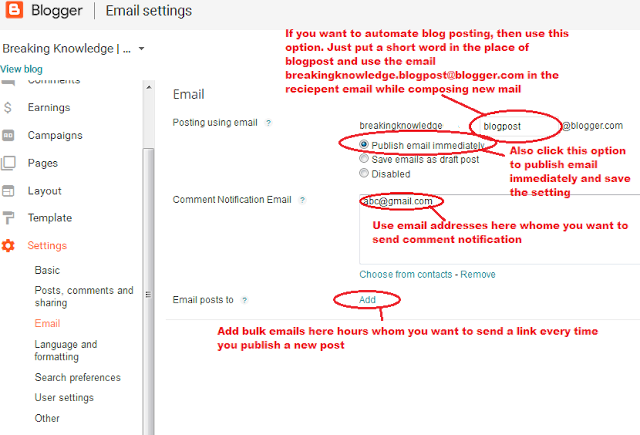
- Next to click on email. Here you can publish your contents through email and share them with others whose email ids you will mention in the email box. Beware of spamming, because each time you publish article will automatically notify the email id holders. So it would be better to put email ids whom you know very well.
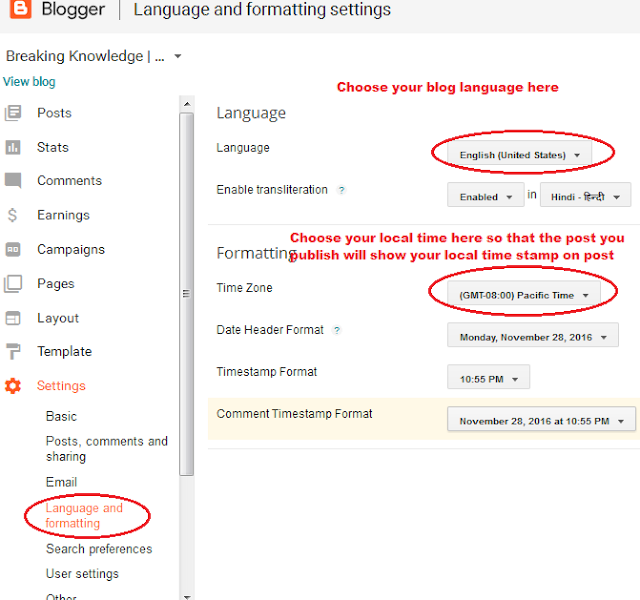
- Next it is Language and Formatting. Here you can choose language in which your blog will be displayed, your location and local time which will reflect in your posts.
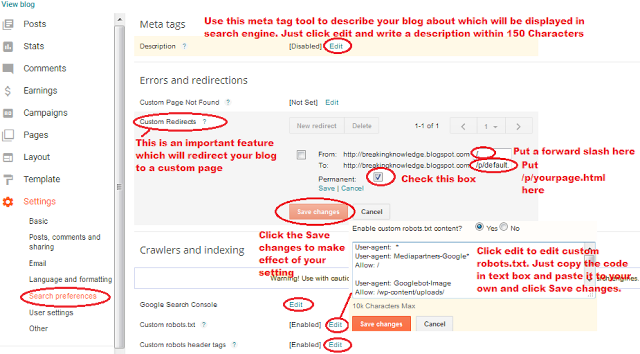
- Next it is Search preference. It is an important setting for your blog as it relates to search engine. Here under Meta tags, in 'Description', you will mention the description of your blog which will be displayed in search engine while a visitor searches for your site contents. Its max length is 150 chars. It will never accept beyond to 150 chars. Another important option is 'Custom Redirect', here you can redirect your blog home page to a static page. It helps you creating your own blogger custome home page. Just follow the procedure describen in image. Next important option is Custom 'robots.txt' which is bydefault disabled. Make it enable by copy pasting the code given in image or follow a robots.txt file creation guide online and paste your own. If you don't understand this setting, then leave it blank as Blogger will automatically set their custom headers.
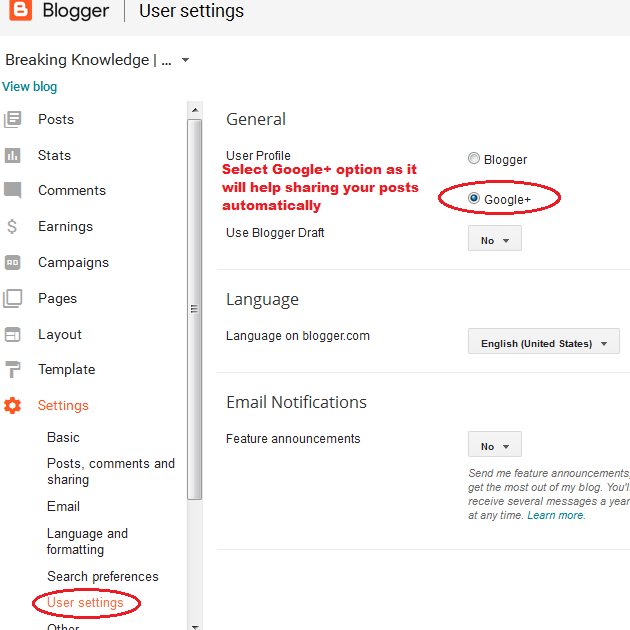
- Now jump to User settings. Here in the image, under User Profile it is selected as Google+ - that means your Google+ profile picture and link will be displayed at end of the post where it will be mentioned as Posted by - your Google+ profile name. If you want to display your Blogger profile instead the change the option to 'Blogger'. Here your Gmail name will be displayed near the Posted by tag.
- And at the last the 'Other' setting is also an important setting for your Blogger blog. Here you can import and export your backups, Delete your entire blog, redirect the default feed link to your own custom feed and update your Google Analytic ID which is very helpful for showing your site metrics. Feed links are important for auto sharing your post URL to any social media.
Blogger Template and Layout
After doing a perfect setting for your blog now it is time to define your blogger layout. In blogging it is important to make place for your content as well as for your gadgets where you want to display your adds. By default Blogger already have a default setting which accommodates all requirements. Still for tricky and quick experience with design it is required some knowledgeable information. Be patience and have with me for sometime, you will be automatically influenced.
Blogger Template
i) a) Now go to the Template tab in left panel. Click on Customize, then click on Adjust width. Here you can set your blogger width for posts and side bar. It is very simple and responsive if you choose a single column layout. Try not to change the default setting. If any time you want update in width of the blog then this setting will help out sure.
b)Next click on Background. Here you can choose your blog background as images and colors. Even you can put your own image also.
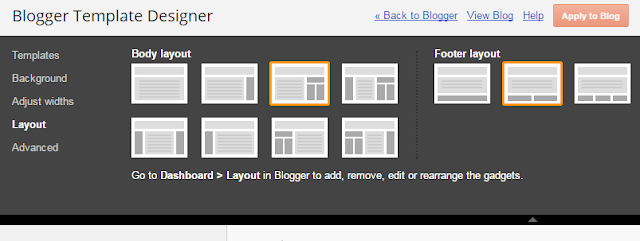
c) Next click on Layout. It is the section where you can choose your blog layout as two column sidebar, single column sidebar etc.
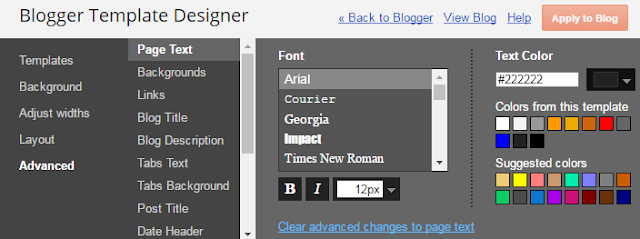
d) Next click on Advanced. This is an important setting for your blog design. Here you can change your post background color, link color, sidebar background color etc. More over you can find Apply CSS option to insert a CSS style into the blog template.
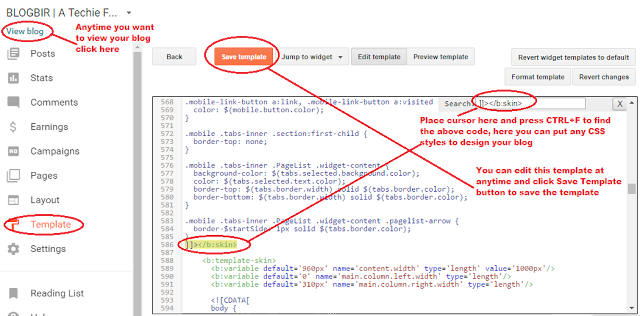
ii) Now come back to the Template tab again and click on Edit HTML. Here you can insert JavaScript, CSS, HTML and modify the template as you want. Suppose you want your blogger posts on home page to be displayed in gridview format, then you can change the template accordingly with your codes. So edit HTML also an important tool for your blog.
Blogger Layout
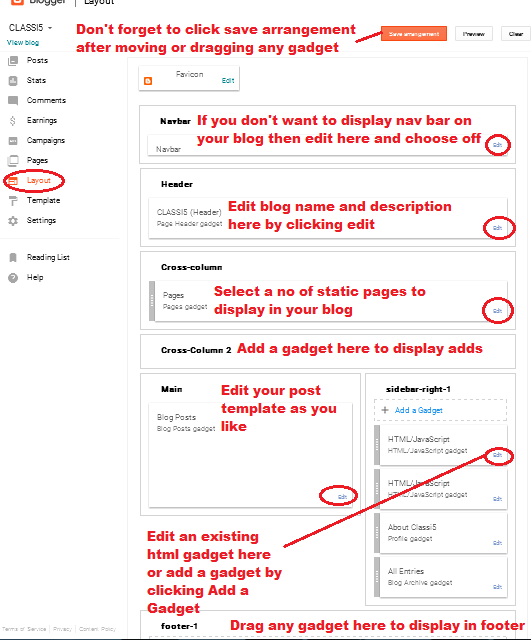
- Then come back to the Blogger Layout tab which is also located in the left panel under the Pages tab. Here also you can design your blog but with in the gadgets provided. Here different gadgets are available for different positions such as - Nav, Header, Crosscol-i, Crosscol-ii, Sidebar, Post or Main, Footer etc. Except post and header you can alternate all gadget positions from top to bottom or from side to top or bottom. It is very simple, just drag and drop process. If you want to add more gadgets in the side bar or in top or in bottom then click on Add New Gadget. Most popular Gadgets are - Blog Archived, All Post, Favorite Posts, Recent Posts, Labels, Pages, Link List, Google+ Follower, Subscribe to email, Search, HTML/Javascript etc.
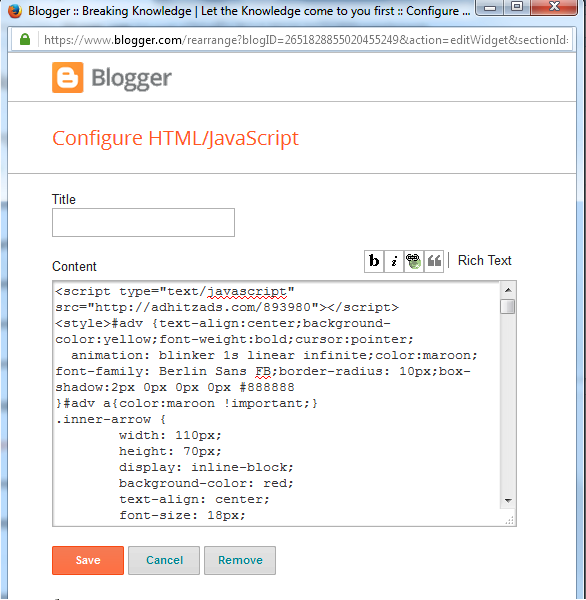
- If you know HTML, CSS and JavaScript better and have knowledge of creating your own gadget, then HTML/JavaScript gadget is very suitable for you. You can put it every where in the blogger except Blogger post. You can hide the existing header gadget and place your own Header Gadget through HTML/JavaScript gadget in the place of crosscol-i. You can put your own designed page gadget in the crosscol-ii or by adding an existing page gadget through Blogger. In the Blogger page gadget you have to choose the pages which you have created in the pages tab from left panel and saving the form. If you want your own responsive page gadgets then use the HTML/JavaScript Gadget. You can put your add codes in HTML/Javascript gadget and place it in crosscol-ii section where it will display properly or else place it in sidebar or in footer.
- Post Gadget: The biggest among all gadget and preinstalled which can never be removed or replaced is the Post Gadget. Here you can choose whether user can see comments on your page, Date time stamp, author name, sharing option etc.
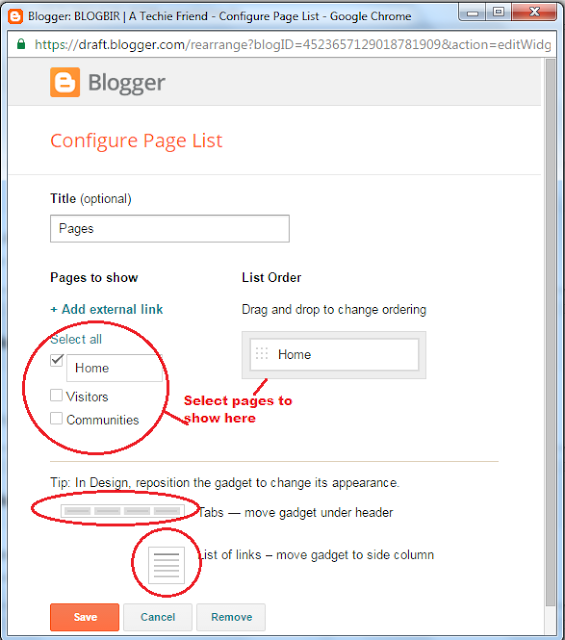
- Page Gadget: By default page gadget is already added by Blogger. If it is not added then you can add it by clicking the 'Add New Gadget' link. If you open a page gadget it will show you a number of pages which you have created in page tab and a page bar where you need to drag and drop the pages you want to display to your visitors.
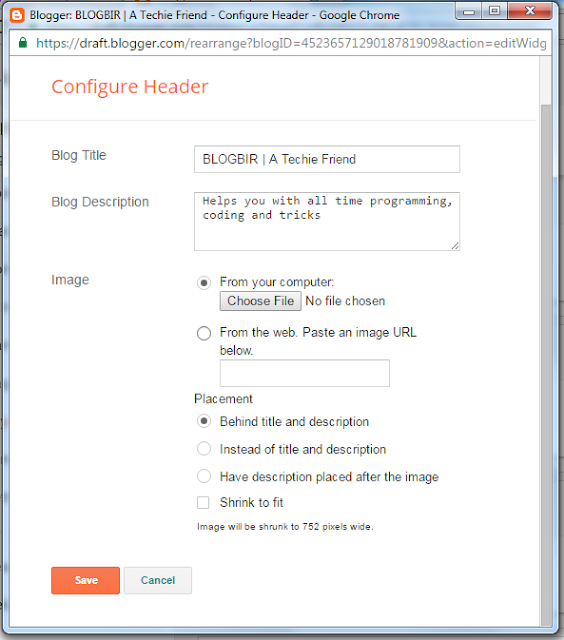
- Header Gadget: The Header Gadgets provides option to write your blog title, description and header image. If you want your own header image instead of blog title, then you can upload image and select the option image instead of header. If you want your image behind the blog title, then you can select image behind title, or description after image. If you want your own header designed through HTML,CSS then you can remove the header gadget and paste the codes in an HTML/Javascript gadget and replace instead of header gadget.
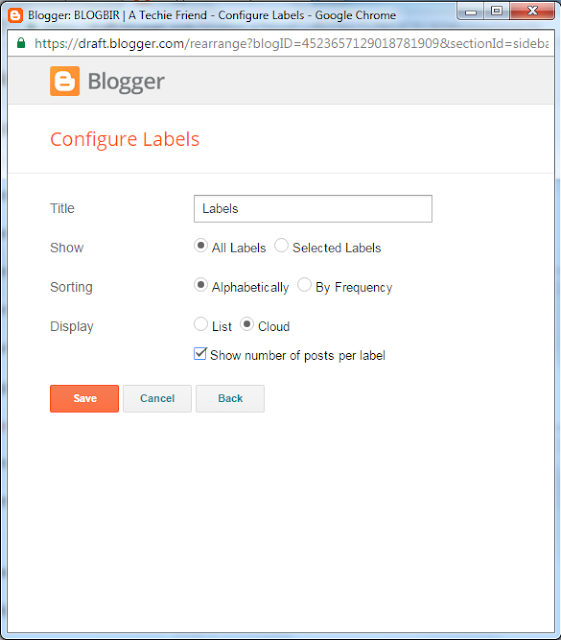
- Label Gadget: Label gadget is an important gadget to describe your posts by categories. For example if you have published an article regarding mobile technology and put a label named as mobile, then your label gadget will show a tag written as mobile. When ever a visitor clicks the tag mobile, he/she will see the post you have written on mobile only. In the label gadget you can sort tags ascending in alphabatically or by cloud that means more the number of posts in a label more will be the font size of tag with numerals of number of posts.
- Search Gadget: In every blog or website there should be a search tool which provides the visitors to quickly navigate your contents. You can add search tool gadget by clicking on "Add New Gadget" or by making a custom search engine through cse.google.com. If you make a custom search engine through Google then it will give some codes to install in your blog page. So get those codes and put it in an HTML/Javascript gadget and place the gadget wherever you want your search tool to display.
- All post gadget: Though it is not necessary to show your all posts links in your blog, but it will be helpful to visitors to navigate all your posts and recent published posts easily. To add this gadget click on 'Add New Gadget' and search for all post gadget and place the gadget in your sidebar anywhere.
- Attribution Gadget: For a better attribution of your blog your blog name or copy right should be written in the attribution section. Blogger already have an attribution gadget preinstalled in the footer section you can't remove this attribution as it is required for Blogger attribution, but you can add your blog name in the attribution. Just click on edit and write your blog name before the line 'Powered by Blogger'.
Blogger Post
After finishing all settings perfectly it is time for start publishing and sharing articles or posts. Now click on post tab from the left panel, then click on new post. A formatted text bar along with a writing text box will appear in front of you. Just start writing your post in the empty text box and make it beautifull by formating through format bar tools. Give a particular title to your post within 40 characters so that your post title will be same as your post link. If it exceeds 40 characters then go to the permalink option in the right hand panel and click custom permalink. Here copy paste your post title and rplace the spaces in between with dashes. Soppose your post title is 'a b c d e' then mention it as 'a-b-c-d-e'. That's it! NOw click on done button to make your permalink. Also any time you want to change your permalink, you can use the same process for.

Now click on Options and in the label box put a label for your post by creating a new one or by choosing existing one. Then click on done and your post will be categorized according to your label and it will appear in the label gadget. Now click on search preferences box and put keywords for your contents. It will help search engine to index your content according to your keywords. For example if you are writing an article about mobiles and accessories then you may put keywords like - 'low cost sd cards, 3.5 mm audio jack, 3000 MAH battery etc' and each keyword should be separated by a comma. If you want your visitors to disallow comments, then click on comments and disable it. Now look at the top right corner, there are Four buttons available such as Publish, Save, Preview, Close. Click on preview to see how your post is looking like, then click on Publish button or click on Save button then Close to save your post as a draft.
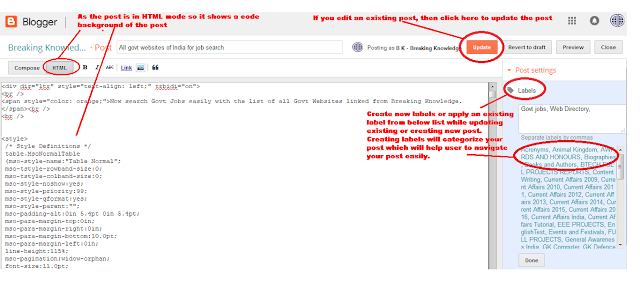
Any time you want to edit your draft you can do it by clicking on the Post tab and looking upto your draft and clicking on Edit link available below the draft. If you have connected your Google+ profile to your blog and set auto sharing on, then your post will be automatically shared in Google+ or else cilck the share link below the post to share your post on social media.
Blogger Comments
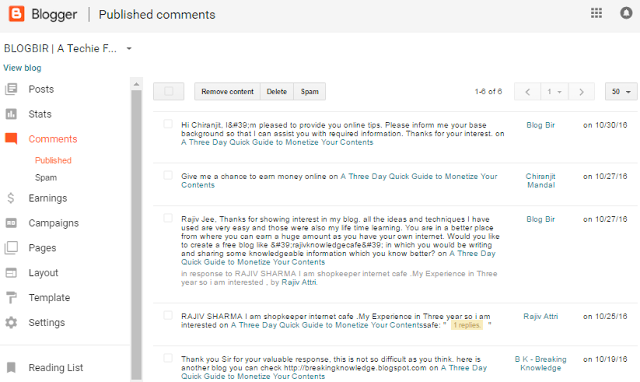
In the comments section you can view the comments given by your visitors. You can delete or spam comments whichever you want. If you see a same comment is repeatedly given more than five times, you can select the comment and click on Spam button so that the commentor if further give comments they will be in your spam box and no more will visible to your visitors.
Blogger Pages
In the pages tab you can create stand alone pages which are simillar to posts but it can be displayed in Page tabs unlike posts. You can redirect your blog home page to a static or stand alone page. Creating page is simillar to creating post rather you can't modify your permalink. So it would be better to keep page title within 40 characters.
Blogger Campaign
Here you can campaign means advertise for your blog through Google Adword which is not a free service. If you want more visitors to your blog then go for it.
Blogger Adsense
Blogger Adsense is a lucrative hope for every blogger who want to earn through their blog contents. It is very rare for Bloggers to have an Adsense account. The main and embarassing reason is your content and Adsense policy. The more genuine and more responsive contents you will have the more the chance of getting approval for Adsense. So try to keep posting twice in a week with genuine contents for two months, that means not copy paste contents or otherwise your own contents and then apply for Adsense and wait for approval.
And the final word
As I told it is possible atleast to be a master of littile things, so keep faith upon yourself and continue your work. If you find extra leisure time then put it into creation of your own content. Internet is otherwise called as content repository. Here more you have content more you will be stable. So find your interests, write your interests and convert it into your contents. And your content one day will be a recognition of your interest.

